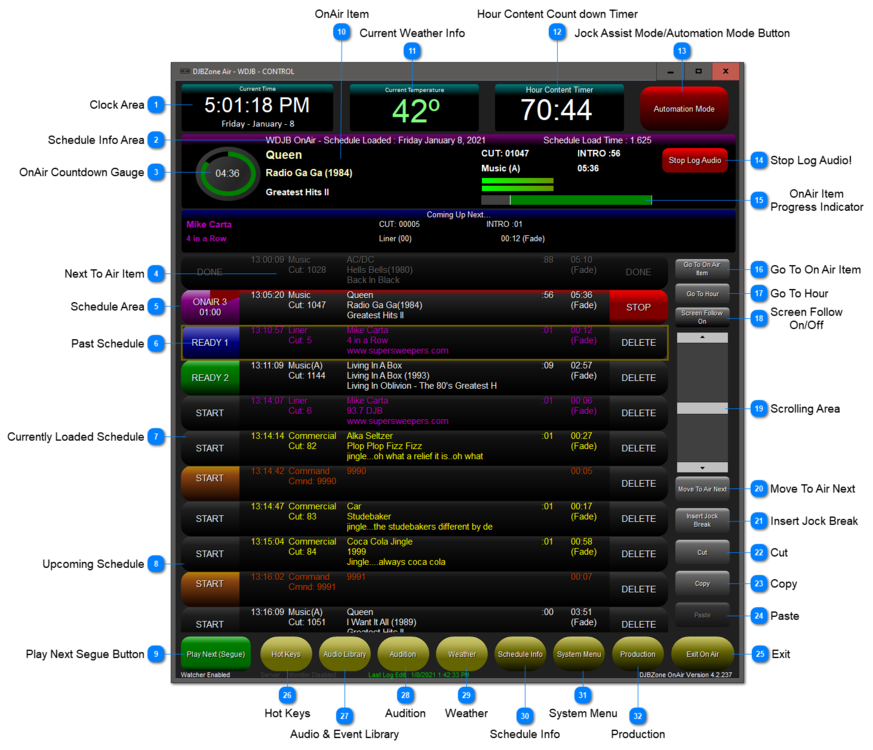
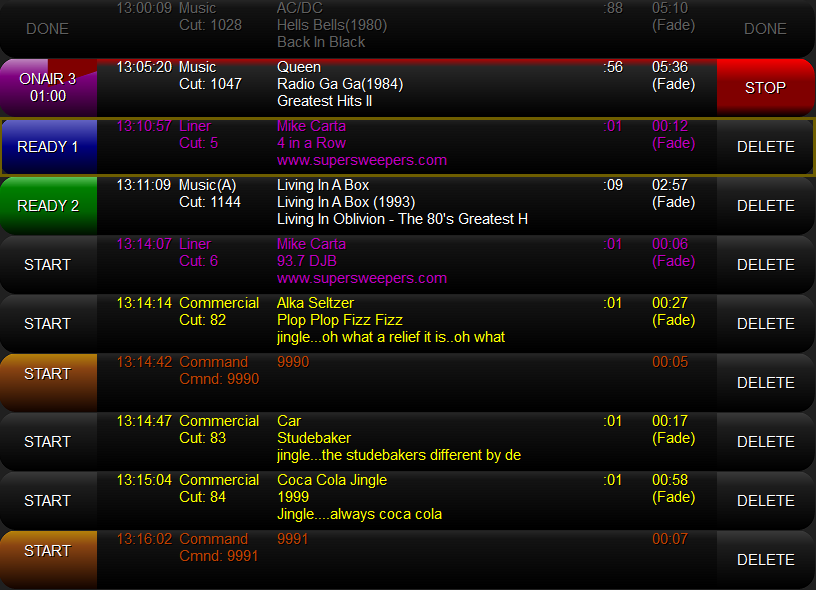
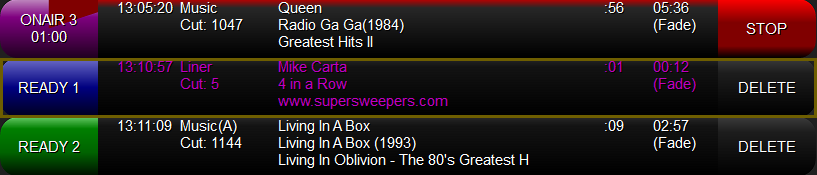
DJB Zone
User's Manual
×
Menu
Index

The OnAir ZONE

The OnAir ZONE
1

Clock Area

1. Clock Area 
 
This area shows the date and time.
If you click on the time, the display changes from a clock to a "time remaining in hour" display.
Click again to return to a classic clock.
2

Schedule Info Area

2. Schedule Info Area
This area shows the currently loaded schedule and how long (in seconds) it took to load.
You can use this as a quick check to make sure the schedule is today's schedule.
If no schedule file was ready at midnight, DJB Zone would have reloaded yesterday's log.
Also as a side note, the color of this bar changes to match the deck that is currently playing. 
3

OnAir Countdown Gauge

3. OnAir Countdown Gauge
Like the OnAir Item Countdown Timer, this gauge counts down to the Segue point on the currently playing cut.
This gauge also gives a visual cue as the timer counts down, the green portion empties counterclockwise.
The color of the gauge changes from green to orange to red as the Segue point approaches.
4

Next To Air Item

4. Next To Air Item
This area shows the same info as the OnAir item but has no progress indicator.
The color of the Coming Up Next... bar also changes to match the color of the next to play deck.
5

Schedule Area

5. Schedule Area
This area show the active schedule (log).
 
The button on the left shows the scheduled air time.  It also doubles as a start button allowing you to start an item that is not next to air.
It shows the color of the deck (blue, purple, or green) which corresponds to the number of the deck. 
If you have a multi-channel sound card with different decks on different pots, this helps you determine which channel is playing.
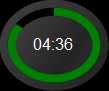
It also becomes a gauge of the OnAir item's progress gradually filling up with red until it changes to the next cut.
The second field has the paper log time.   This is also the area you need to click if you wish to drag an item in the current schedule.
When your mouse is over the area it turns to a lighter shade of grey indicating dragability.
The 3rd field the Audio Type, Category (in parentheses), and cut number.
The 4th field contains the Artist, Title, Album, Intro, Duration, and Ending (Fade/Cold, in parentheses).
You should know that the Duration value reflects the duration up to the Segue mark. 
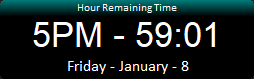
This allows you to know how much time you have before the next item triggers.
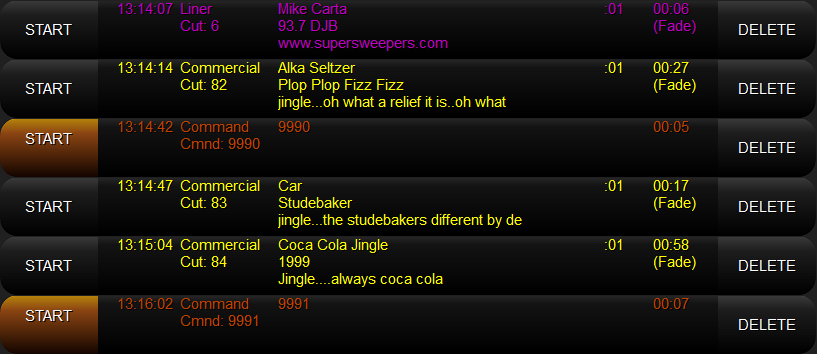
The button on the right says ON-AIR for the currently playing item. 
For past items, the button will say DONE if the item played and SKIPPED if the item was skipped. 
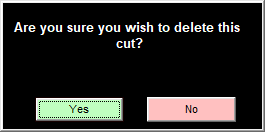
For future items the button will say DELETE allowing you to quickly delete unwanted items. 
You can delete loaded items, but not the item currently playing.
6

Past Schedule

6. Past Schedule
Grayed out items are in the past.
On the far right the button will change to DONE if the item played or SKIPPED if it didn't.
You can still click in the audio type field and drag past items into the schedule if you need to.
You can also scroll back into the past, click an item, and click Cue To Be Next to effectively go back in time.
7

Currently Loaded Schedule

7. Currently Loaded Schedule
The 3 playback decks are color coded:
Blue: Player 1
Green: Player 2
Purple: Player 3
This is very useful if you are running multiple pots on the console.
The currently playing item says ON-AIR in the button at the far left.
And the start button of the playing item will gradually fill with red.
8

Upcoming Schedule

8. Upcoming Schedule
Future events show their paper log time and if you click their START button they will play immediately.
You can click in the log time field and drag items around the schedule if you want to.
The delete button will remove that item from the schedule after answering this prompt:
The delete prompt can be disabled in the Station Settings if desired.
9

Play Next Segue Button

9. Play Next Segue Button
If DJB Zone is playing, this button fades the currently playing item and starts the next.
If it is not playing already this plays the next event but does not put it into Automation Mode.
10

OnAir Item

10. OnAir Item
This left side of this area shows the artist, title, and album.
The middle shows the cut number and audio type (Category).
The bottom right shows the OnAir Item Progress Indicator.
This right side of this area shows the intro time and length.
11

Current Weather Info

11. Current Weather Info
This shows the current weather information.
The DJB Weather updater checks every 60 minutes for new weather.
12

Hour Content Count down Timer

12. Hour Content Count down Timer
This countdown timer shows the amount of audio left in the current hour.
13

Jock Assist Mode/Automation Mode Button

13. Jock Assist Mode/Automation Mode Button 
This Button will Toggle the system between Automation Mode and Jock Assist Mode
In Automation Mode the system will continue to play audio until stopped by a command or a user button click.
In Jock Assist Mode the user must start all events manually using the play next button or the individual start buttons on the left of each schedule item.
14

Stop Log Audio!

14. Stop Log Audio!
This big red button will kill the playing cut and place the system in Jock Assist Mode.
15

OnAir Item

Progress Indicator

15. OnAir Item
Progress Indicator
This gauge also moves across as the item plays.  It starts out green....
 
...changes to orange...
 
...and finally before the cut ends it turns red.  This is a great visual cue for the on air staff.
 
There is also a seldom used feature; you can click on the white bar and drag it to move the current file to a different place in the song.
Not very useful for OnAir, but useful for testing purposes for the engineers.
16

Go To On Air Item

16. Go To On Air Item
This button causes the schedule window to take you to the currently playing item.
17

Go To Hour

17. Go To Hour
Clicking this button reveals a drop down box.
This allows you to look at a different hour by number (0-23).
18

Screen Follow

On/Off

18. Screen Follow
On/Off
If you intend to look ahead or into the past, this button will prevent the schedule window from jumping to the current item every time it changes.
19

Scrolling Area

19. Scrolling Area
This area is the scroll bar. 
Hovering your mouse over this box allows the scroll wheel on the mouse to scroll the schedule.
You can click the up and down arrows to move one line at a time.
You can click the dark grey slider and drag it up and down to move rapidly.
You can click above or below the dark grey slider to move a page at a time up or down.
20

Move To Air Next

20. Move To Air Next
By selecting a line in the schedule, either future or past and clicking this button, the schedule will jump to that point in time.
21

Insert Jock Break

21. Insert Jock Break
This button inserts a command 9996 Jock Assist Jock Break which will stop the schedule and allow manual control in the studio.
 
22

Cut

22. Cut
After clicking to select an item from the schedule, the cut button will remove the item and place it in the memory buffer for pasting.
Only one item may be in the buffer at once, so if you cut or copy twice the first item is lost.
23

Copy

23. Copy
After clicking to select an item from the schedule, the copy button will place it in the memory buffer for pasting.
Only one item may be in the buffer at once, so if you copy or cut twice the first item is lost.
24

Paste

24. Paste
The Paste button is grayed out as seen above until something has been Cut or Copied.
Click on the item in the schedule and click Paste to paste the item above the selected item.
25

Exit

25. Exit
Exit will allow you to close DJB Zone.  If audio is playing, you will have to answer a confirmation dialog to stop the audio and exit.
26

Hot Keys

26. Hot Keys
This button causes the Hot Keys ZONE to appear if it has been closed. See Hot Keys ZONE for more info.
27

Audio & Event Library

27. Audio & Event Library
This opens the Audio and Event Library ZONE which is covered in detail HERE.
28

Audition

28. Audition
This button causes the Audition ZONE to open if it is closed.  Look HERE for details about the Audition ZONE.
29

Weather

29. Weather
This button causes the Weather ZONE to appear if it has been closed. See Weather ZONE for more info.
30

Schedule Info

30. Schedule Info
This will bring up a Schedule Info pane with useful information and a Reload Schedule button.
Click HERE for more info.
31

System Menu

31. System Menu
This button causes the System Menu page to be visible on the main screen.
We will cover the many functions of the System Menu HERE
32

Production

32. Production
This button opens a menu bar allowing you to select a limited set of Production functions.
From the OnAir screen you can access the Production Database Editor, Log Editor, the Voice Tracking module and the Hot Key Editor.
The online help was made with Dr.Explain