This screen allows you to view and adjust various properties of this audio cut. Let's gothrough the options for this screen.
Artists
This is where you enter the artist or company name of the audio cut to be recorded.
For Example:
GARTH BROOKS
CAR TOWN USA
CORONA
WARNING: The ARTIST field must always be spelled the same. Madonna is not the same as Maddonna and you will not get artist protection in our scheduler if you do not spell them exactly the same.
A category is a letter designating a group of songs with common play-frequency requirements. You can have up to 52 categories and you use either a single letter, <A> through <Z> or a double letter <AA> to <ZZ> to identify each category. Categories are defined in the Audio Menu under Category List and you should define your categories prior to starting to work with the Digital juke Box.
For example:
Category <A> = Heavy Currents
Category <B> = Medium Currents
Category <C> = Light Currents
Category <J> = Jingles
Leave the category field blank if you do not wish to use our built-in scheduler or if you do not wish to rotate this audio cut in a category manner.
The Category List can be edited in the Category List Menu Option of the Audio Menu.
The Start Date and Hour are the Date and Time that you would like this audio cut to start being able to be scheduled. The Digital Juke Box will not schedule this audio cut to play prior to the Start Date and Time Your options for this field are to either enter a date or leave blank for none.
Start Date and Hour
The End Date and End Hour are the last Date and Hour that you would like this audio cut to play. The Digital Juke Box will not schedule this audio cut to play past the End Date and End Hour Your options for this field are to either enter an end date or leave blank for none.
It is the job of the traffic person to ultimately put the correct end dates in the traffic system and not the job of the digital juke box to enforce end dates. If a spot expires and the spot it still in your traffic system as being scheduled, it’s the traffic persons responsibility to make sure the spot didn’t schedule in the traffic software in the first place.
The tempo is used to create a better flow of music. Just select the overall tempo of this song. If you are not interested in tempo, then just don’t worry about this field.
Gender Field
The Gender is used to create a better flow of music by placing some seperation between songs by female artists. Just code the songs correctly and we will do the seperation. If you are not interested in Gender, then just don’t worry about this field.
Do you want to force the event prior to this event to fade when the segue occurs?
If you answer yes, a forced fade of the previous audio during On-Air playback will happen.
Normally you would not want to force a fade on your audio cuts since most songs are already fading when the next song starts.
The length of the fade is a setting in the Master Settings section on the Utilities menu.
Fade into next
Do you want this event to force fade into the next event when the segue occurs?
If you answer yes, this cut will fade into the next audio cut during On-Air playback.
This should be used on fill music, songs with a long applause ending, etc...
Normally you would not want to force a fade on your audio cuts since most songs are already fading when the next song starts.
The length of the fade is a setting in the Master Settings section on the Utilities Menu.
NOTE: We have a feature in the Audio Cards Tab of the Master Settings called Fade Into Everything. This will effect only Audio Cuts coded as Music and will cause them to do a forced Fade at the ending Mark.
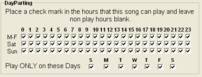
This is where you can edit the scheduling dayparts of this audio cut. Check each hour this audio cut can play. You can adjust the dayparts for Weekdays, Saturday and Sunday.
If you want daypart protection used, you need to answer <Y> to the question "Do you want to use daypart protection?" in the Scheduling Settings, on the Scheduling Menu.
Promote Days
Select the days of the week that this cut can be scheduled. If you only want this to be able to schedule on a Monday, then just check Monday. Otherwise leave them all checked.
Since some traffic systems do not allow for a 5 digit cart number, we have added this so that you can refer a 4 digit numbered cart to one of the Multiple cut carts 5 digit numbers during the import of traffic.
So, let's say you have a cart 8000 that is a King Chevrolet Referal Cart and in this referal field, you select 30100. when you import traffic and it tries to import 8000, it will see that you are refering to Multi Cart 30100 and the system will go to that Multiple Cut Cart Number 30100 and play the next cart from that Multiple Cut Cart.
You can currently place only two commands in the Power field.
-RIP-
This command means you wish to playback a recording in progress by the back ground recorder.
RECORDING IN PROGRESS
If this audio cut is going to be recorded by the background recorder and played back while it is still being recorded, you will need to place "-RIP-" as the first 5 charactors of the title. this will tell the on-air screen to play back this audio cut using a different method.
Volume=XX
This will set the playback volume of this cut each time it plays back. The XX is a number between 10 and 99. after this cut plays, the volume of the next cuts will be set at 100 or full volume.
If you want this audio cut when called for to activate an audio input or relay on any of the broadcast tools boxes, you can tell this field which relays to turn on and the type of switch.
NOTE: You MUST have some piece of audio, even dead air recorded for at least second in order to have a command that will just do a relay command. Just record a really small audio cut on the audio file.
This is the length of this audio cut, in seconds. This number is set when you record or import the audio cut.
You can not edit this field.
Ending Seconds
Enter the number of seconds from the end of the audio cut when you would want the next audio cut to start.
This number can also be set during song playback in the Audio Cuts Database browes screen by pressing <Set Ending> button where you would like the next song to start.
Intro
The intro time is for recording songs or any audio that has an intro that a jock can talk over. This time is displayed on the On-Air screen for Jock information.
IMPORTANT: If you plan to do voice tracking, you MUST set an intro on every song. If you do not set intro marks, your voice tracks will NEVER talk over the intro of the songs. Our Voice tracking is designed to talk up the intro perfect every time.


 Dayparts
 Memo can be used for any information you want. They will be displayed for the length of time that the audio cut is on the air.
 If you want this audio cut when called for to activate an audio input or relay on any of the broadcast tools boxes, you can tell this field which relays to turn on and the type of switch.