Create Daily Schedule WindowIn the Scheduler Main Menu if you select [Create Daily Schedule] a Create Daily Schedule Pop-Up will appear
 Create Daily Schedule Pop-UpAll the functions necessary for creating a daily schedule(s) are within this Pop-Up.
|
 Create A Schedule For What Date WindowWhen the Create Daily Schedule Pop-Up opens, the "Create A Schedule For What Date Window" shows the last date a schedule was made
For current or a forward date, proceed to the [Select Start Date] button (Next Illustration)
|
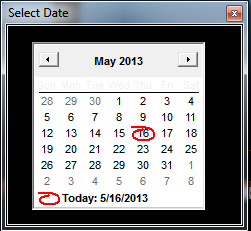
 Select Start Date buttonThe [Select Start Date] button opens a calendar Pop-Up as above, by clicking on the date desired, the "Create A Schedule For What Date Window" shows a new date user selected
To select the date you wish to schedule click the Select Start Date button. A calendar will appear on your screen. Click the date you wish to start scheduling with.
The next time you return to create schedules, the system will remember the next date to schedule.
|
 How Many Days In A Row To Schedule - Number Box?After you have selected your start date (as in illustrations above) enter the number of days you wish to schedule into the “How many days in a row to schedule” Number Box.
The default number shown is 1 day, however, the Number Box accepts the 1 or an amount of days forward from the date selected as entered by the user.
The scheduler when started, will then generate schedules for the amount of days shown.
|
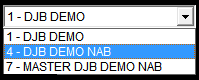
 Choose From Scheduling Log Shell Pop-UpNext, from the Pop-UP, the drop down list will present a list of Log Shells that is user selected to use for the desired schedule day(s).
If you are scheduling more than 1 day, your schedules will all be created with this same Scheduling Log Shell.
|
 Create Schedule Now buttonOnce you confirm the data you have entered click the Create Schedule Now button.
To cancel scheduling at any time press the Cancel button.
|
 Daylight Savings Time Spring Forward day ? Check BoxDaylight Savings Time
If the day you are scheduling falls on a Spring forward day be sure to selected the appropriate check box.
Spring Forward
When creating a schedule in DJB for the first day of Daylight Savings time change, simply check the box that says "Spring Forward"
Then go ahead and create your schedule.
When you are done, you will notice that your schedule is missing the 2am hour all together.
That's it. All Done!
|
 Daylight Savings Time Fall Back day? Check BoxDaylight Savings Time
If the day you are scheduling falls on a Fall back day be sure to selected the appropriate check box.
Fall Back
When creating a schedule in DJB for the Fall Back day of Daylight Savings Time, simply check the box that says "Fall Back"
Then go ahead and create your schedule.
NOTE: Other Action Necessary To Complete Daylight Savings Time Fall Back Change
1) Go to the DJB-II Log Editor, in the Production Main Menu
2) Select the Fall Back day log schedule
3) Remove the hourly time update in the 1am hour 01:00 (if you have one there).
4) When you are done with the time update removal, you will notice that you have a very large 1am hour, that will really take 2 hours to play through.
5) That's it. All Done!
|
 Cancel buttonWhen the program is finished creating the log schedules it will CLOSE the Create Daily Schedule Window automatically.
Click on the Cancel Button to abort the scheduling process that pay be in progress.
If CANCEL is used, users must check the integrity of the schedule aborted. It is recommended that schedules be redone to insure integrity of the log schedule.
|
The online help was made with Dr.Explain
|