This button brings up the Select Hour dialog box to move to a different hour. You can also get this dialogue box by holding Control and pressing the Enter key.
This is an easy way to jump from the currently playing hour to another hour.
Use the spin buttons to select the hour that you want and press enter or click Go Now.
This button opens the Edit Weather dialog box which shows texts boxes to edit the Current Temperature and three other weather memos.
Tip: If your On-Air system is connected to broadband internet, you can use the FREE Digital Juke Box: Now Playing program which updates the weather twice an hour automatically, for your configured location. To install simply click Install Now Playing from the Digital Jukebox Program Folder on the On-Air System. This program populates your website with what is now playing, and is run in the background on the system tray. It also performs online and off-site data back-ups daily at 12:15AM. You can find more about the Now Playing Program by reading the Now Playing manual.
The Runtime at this Event button displays a pop-up box which calculates approximately when the selected event will play in the hour.
Note: This is not an exact science, there are many variables which can make this calculation inaccurate, but always know that you will be within 1 or 2 minutes of the predicted time if all events are valid. So, for example, if you are recording a voice track for 15 past the hour, you might want to state "It's about 15 past the hour..." to be more accurate in your voice track, you might want to avoid saying the time all together. If you need the time to be announced you can use the Time Announce feature which is located and can be configured in the Pro Features Menu.
The Runtime 24 Hours button displays a pop-up which calculates the total runtimes for each hour. This feature simply shows you how many hours and minutes is contained in each hour of the day. If you're a music station you should always strive to get the estimated runtime close to 1:06 minutes. Then use the 9999 event command, which is an end of hour time update, which will ensure that your hour starts near the top of the hour.
Note: You do not need a 9999 command in hour 23. Going from one day to the next is an automatic feature and will update automatically. Run Time feature is not an exact science, there are many variables which can make the total hour calculation inaccurate, but always know that you will be within 1 or 2 minutes of the predicted total time, if all events are valid.
The Take Me to the Next Event button highlights the next event on the event screen, after what is currently being played. You might want to press this if you are editing another event in the day and you need the Digital Juke Box to get back where it belongs prior to playing the next event.
The keyboard shortcut for this button is the spacebar and should be pressed only to select the next unplayed event in the current hour. Audio Cuts are, by default, marked red after played on the On-Air system only.
Note: The currently selected event is what is "On-Air Next" and will play at the end of the currently playing audio cut.
The Segue Buttton plays the next (highlighted) event immediately. It can be used to start the automated mode when the Digital Juke Box starts, or it can be used to fade out the current event and start the highlighted audio cut.
The keyboard shortcut for this button is the F5 (Function 5) key.
The Segue button is how you can force the Digital Juke Box to make a mix at any time. Just press the F5 key or the Segue Button and the mix will instantly occur.
The fade length of the previous song can be set in the master settings under forced fade time. Generally 1.5 to 3.0 seconds is perfect.
The Exit On-Air Screen button will exit the On-Air Screen. As a safety feature; the button is automatically deactivated until you press the Stop all Audio Button (See Figure 19) and select Yes to stop all audio. You cannot press this button until it is darkened showing that it is activated.
The Kill Cart Rack Audio Kills the Cart Rack Audio only which is the short audio cuts that can be programed into the "Rack" of tabs and blue buttons at the bottom of the screen.
The Cart Rack tabs gives you the ability to categorize 50 buttons into 10 groups of 5. Select Rack 0 through Rack 9 tabs for the rack you wish to display the buttons for. The selected rack tab tex is in bold, exactly like Rack 0 is.
The Stop All Audio button will bring up the stop all audio dialog box. When you select Yes from this box it will stop all audio and activate the Exit On-Air Screen button. This button must be pressed if you are playing audio before you can press the button to exit The Digital Jukebox On-Air Screen.

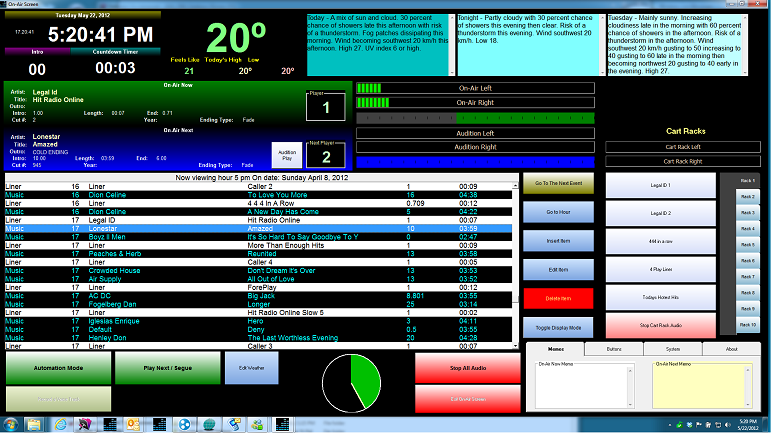
 The Memo Text displays whatever you typed into the memo field in the audio cuts database for the audio cut playing and next to play.
 System Messages will display any Satellite IO commands, Background Recording Starts and Finishes and other messages.